NGINX is the #2 web server (as of the time of this writing) in the world, second only to Apache with 42% market share. It is one of the newest web server types, and has been the fastest growing type of web server on the internet in recent years. What is behind its success?
Most modern web companies use NGINX or some variant of it to serve web traffic to end users. Though is it predominantly used as a web server in practice, NGINX also is a very highly performing and scalable reverse proxy that can be used in front of other types of servers, not just as a standalone web server. The purpose of this post is to dive deep into the inner workings of NGINX to improve my own understanding of webservers and web infrastructure.NGINX is such a foundational internet technology at this point that many emerging technologies (such as Envoy) take advantage of many of NGINX’s architectural strategies, and so having a solid understanding of NGINX will give me a good technical foundation to understand these still emerging technologies. As a product manager, I’m not going to be writing web server code, and most likely not going to be tuning servers for performance – but understanding the fundamental building blocks of threading, processing, socket management, and processes will help me be a better product manager and to collaborate more efficiently with engineers who do.
nginx (pronounced “engine x”) is a free open source web server written by Igor Sysoev, a Russian software engineer. Since its public launch in 2004, nginx has focused on high performance, high concurrency and low memory usage. Additional features on top of the web server functionality, like load balancing, caching, access and bandwidth control, and the ability to integrate efficiently with a variety of applications, have helped to make nginx a good choice for modern website architectures. Currently nginx is the second most popular open source web server on the Internet.
http://www.aosabook.org/en/nginx.html
NGINX History
- 1990s – Apache the dominant web server
- 2000s – Single web server model doesn’t scale
- 2002 – Igor Sysoev begins development of Nginx for Russia’s Rambler search engine
- 2004 – Nginx public launch
- 2011 – NGINX company founded to offer commercial grade support and services for NGINX

NGINX Architecture
Nginx was created primarily to solve the C10K problem pioneered by Dan Kegel. Essentially, traditional web servers (Apache) were designed for single web server architectures and did not really have in mind the micro-services and cloud centric internet that exists today (and started to exist in the early 2000s). As a result, engineers were having to come up with creative solutions to make Apache scale using things like F5 load balancers and server farms. Nginx was developed in 2002 by Igor Sysoev to help scale Russia’s Rambler search engine and the primary focus of nginx then (and now) is was connection and process caling – helping servers to support more concurrency in connection handling.
NGINX uses a master process that spawns child / worker processes. The role of the master process is configuration management and worker management, i.e. reading/evaluating config files and creating/killing/restarting child processes. The role of each worker process is to listen for HTTP requests on a specific port (typically port 80) and respond to them by serving a file or by passing the request off to an event handler if the request is more complicated. Event handlers can be extended via modules. These settings are stored in the file system using a configuration file, nginx.conf.
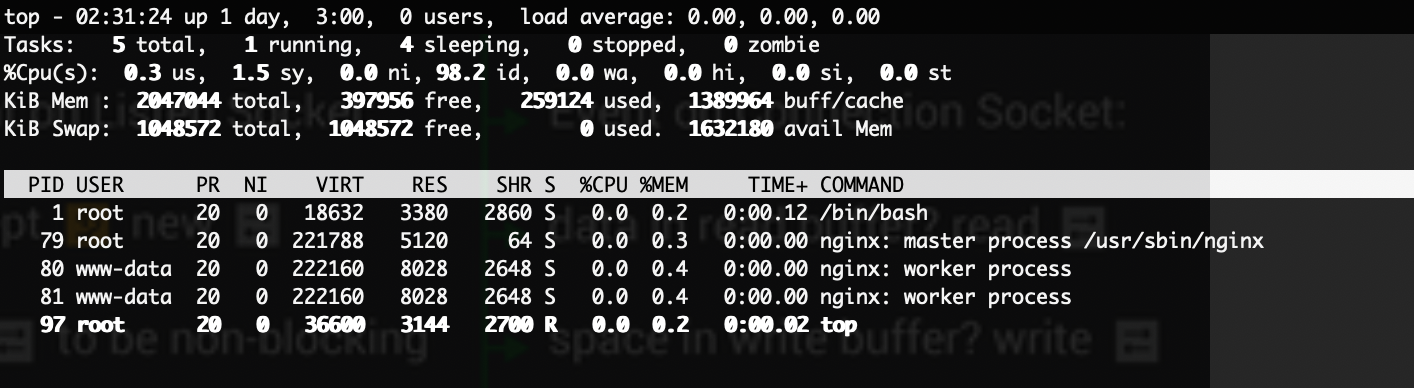
There are four different types of NGINX processes:
- Master – manages all nginx processes in the OS and via the configuration file nginx.conf
- Worker – is the web server, handles all incoming requests
- Cache Manager – prunes the cache via LRU algorithm, the “sweeper”
- Cache Loader – loads cache metadata into memory at utilization, doesn’t actually load cache contents
Worker process architecture
The fundamental process to nginx is the worker process, which consists of:

- Inbound– where traffic and requests come in to NGINX, sometimes referred to as the “front end”
- Connection State Machine (HTTP, Stream, Mail types) – process for connection handling
- Disk I/O and cache – interface with disk and data stores
- Access and Error Logs– logging and CLI
- Proxy– interface with Origin Servers for proxy mode and to pull content, sometimes called the “upstream” connection, the paradigm being that the end users/clients are “downstream.” Sometimes this is referred to as the “backend” vs. the “front end” that faces end users
- Fast CGI (Common Gateway Interface) – where applications interface with the server. Requests can be passed off to handlers here.
Data flow – a worker accepts all inbound requests and traffic via the inbound interface and via a socket that is assigned via the NGINX master process. The worker then proceses the request using the appropriate protocol, i.e. HTTP, Stream, or Mail:
HTTP – The HTTP Loop (referred to as a state machine in the diagram below) is shown below and includes things like inspection of the HTTP Header, TLS handshake/terminations, authentication. Most content can be handled via the HTTP protocol today, even video streaming using HTTP Streaming Protocols like HLS and Byte Range requests.
Event Driven Architecture
Unlike Apache, NGINX uses an event driven architecture. In other words, it manages a pool of sockets (aka connections) and a pool of workers (aka servers), and dynamically assigns a worker process to a server when there is an appropriate event waiting a each, for example some data has a arrived at the socket via the internet (usually slow) or the server has content ready to send (usually slow). This avoids blocking and waiting, which ultimately drives scalability in connections since each process consumes memory and CPU time which are finite resources. This is all driven by a queue system at the OS level.
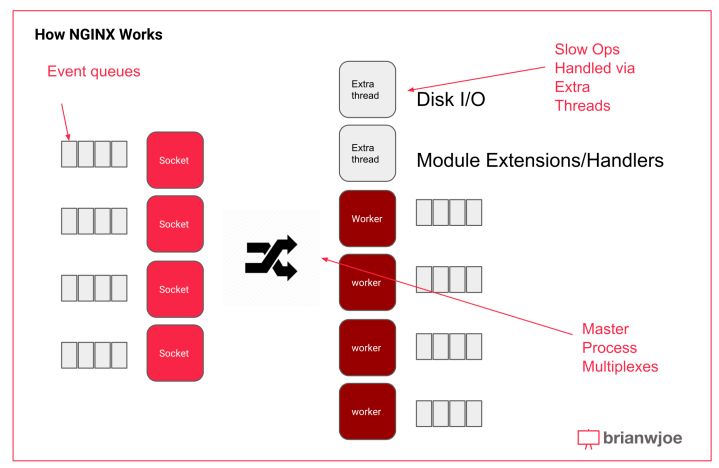
Thread Pooling
In the early versions of NGINX, each worker could still block on long latency operations like disk writes and reads, however in NGINX 1.7.11, this problem was alleviated by the introduction of thread pooling, which allows NGINX to utilize additional threads for slow operations like disk reads and writes instead of consuming an entire worker process/thread. Thread pools are implemented for the following operations on Linux:
- aio_write()
- sendfile()
- read()
Configuring NGINX
What are the different contexts?
The nginx.conf file can be hard to understand without a clear view of it’s organizational structure. This structure can best be understood as a series of contexts that are asserted by an administrator that lay out the rules and modes of operation that will take place in each context. An NGINX configuration structure will have the following outline :
- main{} context – the overall context for your NGINX
- event{} context – how NGINX handles connections and the events that come in via connections
-
- http{} context – how NGINX will handle inbound HTTP/HTTPS connections
-
- server{} context(s) – asserts virtual/logical servers to handle inbound requests. there are typically multiple servers and they can be configured to do load balancing, etc.
-
-
- location{} context(s) – a logical definition of a type of client request and that can be used to configure different treatments of different requests, i.e. /pics/* and /movies/*
-
-
- upstream{} context – this defines the handling origin servers, or servers that NGINX can reverse proxy into. Such as, how many are there, what’s the load balancing policy, etc.
# main context
events {
# events context
. . .
}
http {
# http context
server {}
location{}
location{}
server {}
location{}
location{}
upstream{}
. . .
}
Request Routing via the Server{} directive:
When a request comes in, NGINX first has to decide which worker process (server) will process the request. This decision can be configured in nginx.conf using a match on parameters in the HTTP header such as IP address, port, server name / host name (i.e. “www.example.net”). The example configuration block from a nginx.conf shows how 3 virtual servers are listening for different host headers (www.foo.org, http://www.foo.net, http://www.foo.com) but all on the same port (80). In this example, a default server (foo.com) has been set up in case the host header does not match any of the asserted host names.
server {
listen 80;
server_name foo.org www.foo.org;
cc
...
}
server {
listen 80;
server_name foo.net www.foo.net;
...
}
server {
listen 80
default server;
server_name foo.com www.foo.com;
...
}Request Routing to Origin using the Upstream{} directive:
Nginx defaults to a round robin load balancing policy. In the example below, three webservers (srv1.example.com, srv2.example.com, srv3.example.com) all are set up as the upstream service for myapp1. Requests for upstream location app1 will get load balanced to the three webservers in a round robin fashion. Periodically, health checks to each server will ensure that they are still working and should remain part of the upstream pool. This can be configured using the max_fails and fail_timeout directives.
http {

     upstream app1 {
        #optional_params_here;

        server srv1.example.com;

        server srv2.example.com;

        server srv3.example.com;

     }

}
Additional tweaks can be made to the load balancing policy by adding additional configuration parameters within the upstream object:
- least_conn: least connected load balancing, distributes the load more fairly and try to send requests to less busy servers
- ip_hash: causes session persistence using an IP hash so that requests are continually send to the same upstream server
- weighted load balancing: can also be done by inserting a weight value after each server name, for example:
upstream myapp1 {
server srv1.example.com weight=3;
server srv2.example.com;
server srv3.example.com;
}Reverse Proxy Routing using proxy_pass directive
A reverse proxy can be set up using the proxy_pass directive within a server directive. In the example below, a server is set up to listen on port 80 and proxy_pass is configured to upstream location myapp1 via the http protocol. This could also be set up as a domain name, an IP address, or port.
server {
listen 80;
location {
proxy_pass
http://myapp1;
}
}NGINX Configuration Management Scalability:
Management of Request Routing and Load Balancing policies can be a challenge when oeprating at scale, for example if you’re running a global CDN with tens of thousands of customers, each with their own upstream services and request routing policies. In these cases, configuration files can become extraordinarily large with each of these the server locations and upstream location directives.
This requires some tuning, such as splitting the nginx.conf files into smaller files and spreading them out, and then selectively including the appropriate files for each application. However, for the CDN use case where all context are needed in all of your proxy servers, this can require even more complex optimization techniques such as lazy loading of only the most comonnly requested server and upstream configurations.
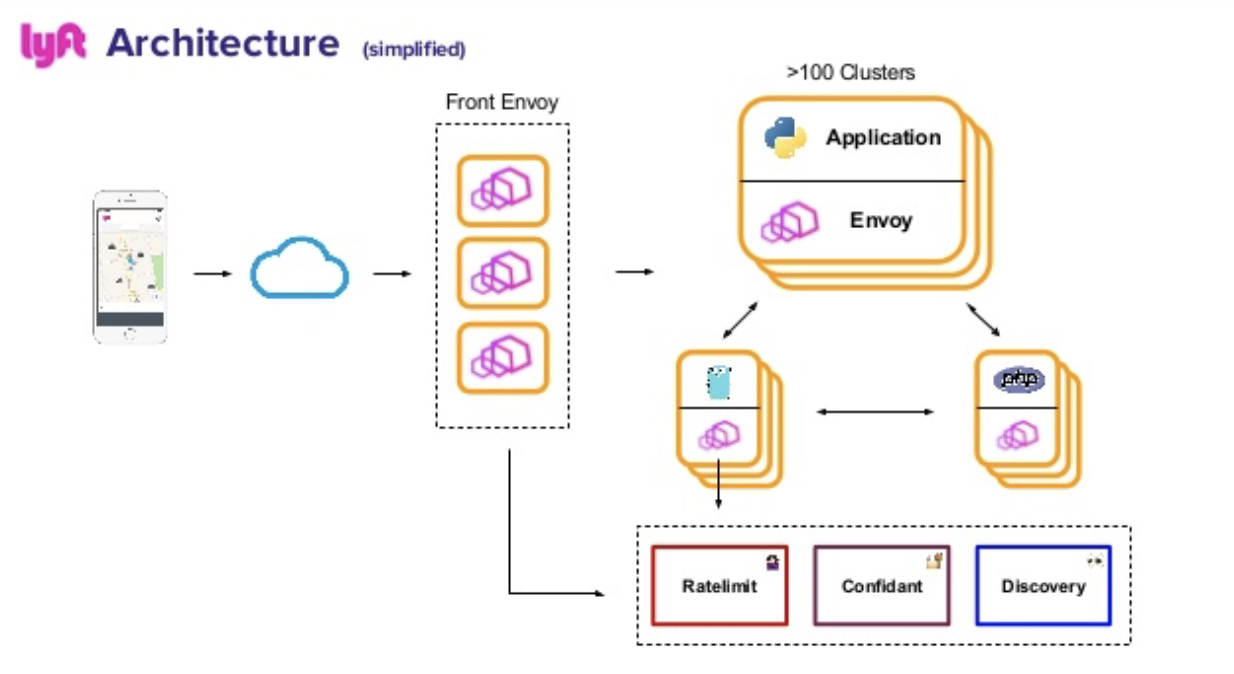
Managing all of this configuration detail via configuration files, especially in large deployments or microservices environments, can become burdensome. This is where emerging technologies like Envoy and Istio can help abstract some of this adminstrative load by making the application request routing logic part of an API that applications can directly request:
Caching
Cache Configuration using proxy_cache_path in the HTTP context:
Proxy_cache_path is used to configure the cache with various settings, it is usually asserted in the HTTP context. After this is configured then proxy_cache is used to activate it.
- path/to/cache – local disk directory for the cache
- levels – the number of levels in the disk hierarchy for file storage. defaults to 1 but 2 is recommended to stay a little more organized
- keys_zone: the size of the memory zone that is used to store cache metadata (one:10m in this example), this allows for HIT/MISS calculations without having to check the disk which is slow
- max_size: maximium size of the cache (10g/10 GB in this example)
- max_inactive: how long an object can stay in cache before it gets deleted, (60 minutes here)
- use_temp_path: if you want to write it to temporary file location instead of direct to cache you can turn it on here, but not recommended because it requires 2 writes
proxy_cache_path /path/to/cache levels=1:2 keys_zone=my_cache:10m max_size=10g inactive=60m use_temp_path=off;
server {
#
...
location / {
proxy_cache my_cache;
proxy_pass http://my_upstream;
}
}
Cache Invocation using proxy_cache
After the proxy_cache_path is configured, proxy_cache is declared within a server location context. In the example above, the location is “/” so everything is cached. However more specific URLs can be used if more precise caching is required (i.e. “/pics/’)
Cache Tunables
There are many parameters that can be used to tune the cache to implement desired behavior. This parameters include:
- proxy_cache_revalidate – only retrieves new content, implemented by using conditional GET requests with If-Modified-Since HTTP header added to the GET request
- proxy_cache_min_uses – defines a cache fill policy, i.e. how many times does an object need to get requested before it is cached
- proxy_cache_use_stale – if Origin is unreachable, can be configured to serve expired cache items
- proxy_cache_background_update – allows origin fill requests to continue on if they are slow
- proxy_cache_lock – if multiple concurrent requests for the same object, all requests block except for the first one, then once the object is retrieved all requests are served out of cache. Reduces bandwidth consumption and prevents potential DDOS of Origin, i.e. for a live streaming application
server {
#
...
location / {
proxy_cache my_cache;
proxy_cache_revalidate on;
proxy_cache_min_uses 3;
proxy_cache_use_stale error timeout updating http_500 http_502
http_503 http_504;
proxy_cache_background_update on;
proxy_cache_lock on;
proxy_pass http://my_upstream;
}
}
Cache Control Headers
NGINX respects all Cache control headers by default, however that can be shut off via the proxy_ignore_headers directive. A listing of Cache Control headers is provided below from Mozilla.org
Request Headers:
Cache-Control: max-age=<seconds>
Cache-Control: max-stale[=<seconds>]
Cache-Control: min-fresh=<seconds>
Cache-Control: no-cache
Cache-Control: no-store
Cache-Control: no-transform
Cache-Control: only-if-cachedResponse Headers:
Cache-Control: must-revalidate
Cache-Control: no-cache
Cache-Control: no-store
Cache-Control: no-transform
Cache-Control: public
Cache-Control: private
Cache-Control: proxy-revalidate
Cache-Control: max-age=<seconds>
Cache-Control: s-maxage=<seconds>Purging Cache with proxy_cache_purge:
NGINX can Purge, but you have to pay for a commercial subscription. To Purge, all you need to do is use the proxy_cache_purge directive in the server and set up a regex match that will invoke it (the HTTP PURGE method is used in this example):
proxy_cache_path /tmp/cache keys_zone=mycache:10m levels=1:2 inactive=60s;
map $request_method $purge_method {
PURGE 1;
default 0;
}
server {
listen 80;
server_name www.example.com;
location / {
proxy_pass http://localhost:8002;
proxy_cache mycache;
proxy_cache_purge $purge_method;
}
}Extending NGINX using Modules
One of the great things about NGINX is it’s extensibility via modules. This extensibility makes it a very powerful platform that can be used for many types of applications beyond basic web server and reverse proxy.
NGINX itself has a number of internally developed modules that are part of the distribution. In addition to that, there are a number of third party modules built on top of NGINX and most of those contributions are open source. NGINX offers commercial support for a subset of these modules as well. Oh yeah, Signal Sciences offer our own NGINX module too!
A few notable modules:
- ngx_http_auth_basic_module
- ngx_http_fastcgi_module
- ngx_http_hls_module
- ngx_http_gzip_module
- ngx_http_geoip_module
- ngx_http_api_module
- ngx_http_ssl_module
- ngx_http_memcached_module
- ngx_http_mp4_module
sources:


Leave a comment